2011년 12월 1일 목요일

Flash Photography


Project Outline: 

In this photography project, I focused on flash photographs. By using the flash, I could take a step to the higher level photography. Throughout the project, I took shots that benefited from the flash.

 Class Notes:
In photography, flash is defined as a device that produces a flash of artificial light. Another term used for flash is strobe. When taking a flash photograph, we first have to know that aperture affects the flash, while shutter speed is used to adjust ambient light. There are several other important terms to know when taking a flash photograph. First term is Speedlight. Speedlight is the brand name used by Nikon Company for its photographic flash units. Speedlight can be used wirelessly with up to four groups of other Nikon Speedlights. Basically, it enables various Nikon cameras to control multiple Nikon flash units by sending encoded signals to slave units. 
 
A flash can be identified in three parts: head, body and foot. As shown in the picture on the left, the top part is head, the center is body, and the bottom part is foot.
However, another term to know is hot or flash shoe. It is a mounting point on the top of a camera where we attach the flesh.    


There are several types of flash photograph settings: on-camera bare flash, off-camera bare flash, off-camera bare flash with reflector, diffused flash, snoot, grid, flag, cookie, gel, and multiple flashes. The first ordinary setup is called on-camera bare flash. As the name illustrates, if we attach the flash on hot or flash shoe and shoot a photo, it becomes on-camera bare flash photograph. However, the photograph would not be effective by using this setup since light directly shines the subject. The photograph is likely to appear harsh. Example:

In order to prevent this, there are other kinds of setups. The second well known flash setup is called off-camera bare flash. We as photographers know that lighting is the greatest aspect of photography. So, in order to take great flash photographs, it is better to control them, and off-camera flash gives you this opportunity. Example: 


There are many ways to control your light by using the off-camera flash, and one way is to use reflector. A reflector is an improvised reflective surface used to redirect light towards a given subject or scene. It gives soft box-style lighting, or even very broad lighting. Example:


The other type of setup is called diffused light. Diffused light is soft light that is scattered. When light is diffused, it gives warm tones to the image by making a softer shadow, which provides depth to the photograph. Photographers should diffuse the light when they want to add warm and soft light with softer shadows on their photographs. There are several ways to diffuse the light. The most common way is to use photography umbrellas. They are the same as normal umbrellas except they have a reflective lining that bounces the light to diffuse it. One of the benefits of using photography umbrellas is we can diffuse the light without losing the control of direction of light. Example:


Another type of setup photographers can use for flash photographs is snoot. Snoot is a cone shaped shield that the photographer can use to control the direction and radius of the light. It helps to isolate the subject by stopping light from falling in a larger quantity than you wanted it to be. Basically, the light is more controlled where distribution of light is a bit more even. Example:


The sixth type of setup is grid. Grid narrows the flash into a spotlight. The diameter of the spotlight can be changed by moving the flash closer or further from the subject. Grid makes the light even more controlled than snoot. Example:
Flag is another type of setup. Flag can be a cardboard, thick paper or foam paper. It blocks light and prevents it from spilling onto your model. The idea is to light only one part of the scene. Example:


Photographers also can use cookie as their tool. Cookie is anything that has shape that allows illuminating the same shape on the model. Example:
Gel is another tool for flash photographs. It is a strip of colored paper that changes the color of the flash.  Example:
The last setup is called multiple flashes. It is used when we want to use more than one flash. Example:


Contact Sheet:
Final Selections:


I chose these photographs because they're the great examples of flash photograph. When I was taking the first two photos, I was curious what will happen if I use  gel and multiple flashes together. The results were great. The color contrast between orange and blue worked better than I thought. I chose bottom two photographs because they were the great examples of gel.


Although this unit was challenging, I really enjoyed it. Every work I did in this unit was absolutely new to me. At first, when Mr. Tahan intruded the flash photography project, I thought it would not be as hard as the previous unit. Nevertheless, as usual, my prediction was wrong. Although I watched a movie about the flash photography, I still couldn’t act fluently with flashes. With my short memories, I could not remember all the terms and had to ask for support. However, as I became more experienced and learned from previous mistakes, I began to feel comfortable with flashes. My brain generated innumerable ideas about the flash photographs.  Then, I came to this idea of using multiple flashes with gels. The satisfied results came out. Before this unit, I knew about flashes, but didn’t know the ways to use them efficiently. After shooting for several hours, I began to understand the basic concept of flashes.

Development Options:

If I were to shoot the images again, I would want to try using other setups. As I explained in class notes, there are about ten different setups I can use when taking flash photographs. Out of ten, I only used three setups to take my photographs. If I have another chance to take flash photographs, I am more than willing to use other setups.


2011년 11월 13일 일요일

Unit 3 Portfolio Entry- Light effects by the long exposure

Project Outline: 

In this photography project, I focused on creating light effects with the long exposure. I’m really interested in photographs that have used awesome light effects. It was shocking to me that the camera can create and capture light effects without using any kind of computer programs. This inspired me to choose the theme of this project as the light effect.  I took attractive pictures by using the light effects.

Class Notes:

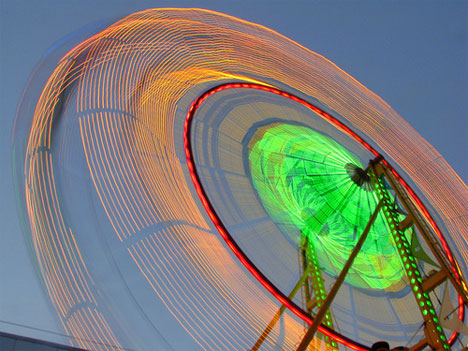
In photography, exposure is defined as the total density of light allowed to fall on the photographic medium during the process of taking a photograph. In other words, it is a single shutter cycle. Shutter cycle is the process of the shutter opening, closing, and resetting to where it is ready to open again. There are two types of exposure: short and long. A short exposure occurs when a single, short shutter cycle captures enough high-intensity light. On the other hand, a long exposure is a single, protracted shutter cycle that captures enough low-intensity light. Basically, a short exposure occurs when the shutter is open for a short amount of time, while a long exposure happens when the shutter is open for a long period of time. To take a short exposure picture, a photographer needs to use a fast shutter speed. In contrast, a long exposure needs a slow shutter speed. However, by using a short exposure, a photographer can take sports and fast action photographs by freezing the subjects. On the other hand, a long exposure offers various types of pictures. For example: motion blur and curtain synchronization. A motion blur happens when a photographer uses slow shutter speed, and does not stop the motion. This gives an effect that emphasizes the movement and action. There are several ways to take motion blur pictures: camera shake, subject motion, panning, and pull zoom. Example of camera shake:  
Example of subject motion: 
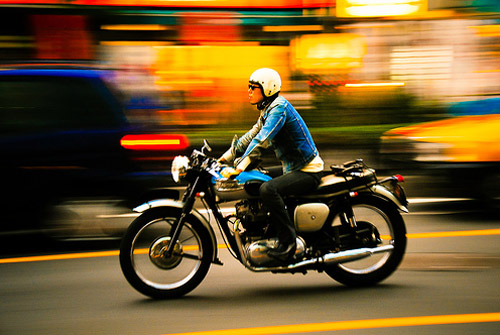
Example of panning: 

    
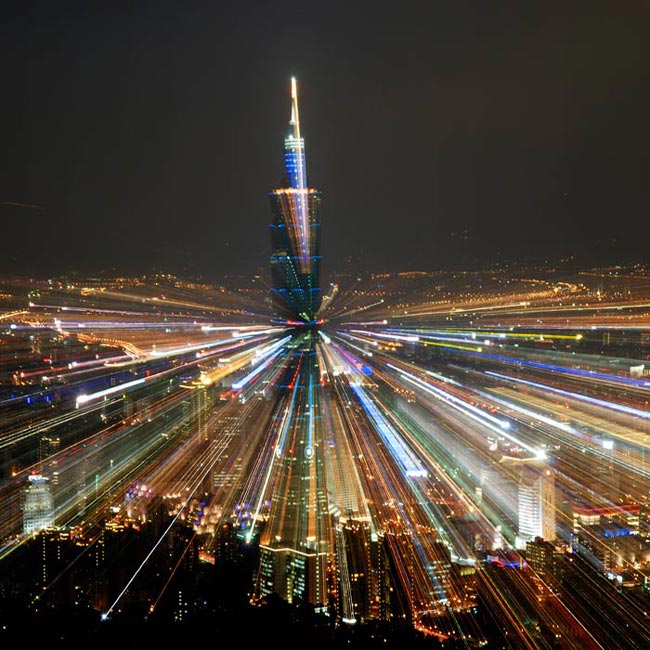
Example of pull zooms:

 Curtain synchronization is a technical aspect of using flash with long exposure. There are two types of curtain synchronization: first and second curtains. When the camera is set to synchronize the flash and shutter at first curtain, shutter opens and at the same time the flash fires. Because the flash fires only for a short time, the flash light time doesn't coincide with the exposure time – it's much shorter. Only the first few fractions of a second the scene is lit by the flash. On the other hand, the second curtain happens when the flash fires at the end of the exposure time. The difference between the first and second curtain synchronization can be clarified by the example of moving car. By using the first curtain, the moving car first will be visible (frozen) with the flash, and the all bright spots in the car (such as the headlights) will drag through the frame. The photograph would show the car with two (or more) light streaks going from the headlights (and other places) and crossing the frame in the direction of the car's movement.
With the other setting (second curtain) the car will be frozen and visible at the end of the exposure time. The car has moved for some time in the frame leaving the light marks
along its movement, which lead to the visible car.

Top image is an example of first curtain sync, while the bottom image is an example of second curtain sync.   

 The theme I focused on for this project was light effects, which can be created by using either one of the long exposure techniques I mentioned above. After setting the camera to relatively slow shutter speed in a completely dark place, a photographer needs to control and draw the light ray in the direction of his or her camera. It is necessary to set the camera on the tripod because no matter how steady people's hands are, people cannot hold something steady for a long time. Also, even it is fine to use any kinds of light to create light effects, it is preferable to use flash lights. However, a person needs to have a purpose of light effects before he or she takes a photo. Taking photos without any purpose will not give desirable nor qualified results. There are other important points to understand when a photographer takes a light effect photograph. First, he or she has to use a low ISO such as 100. By using a low ISO, it is possible to only focus on the subject light by preventing other distracted lights. Also, he or she needs to use a small aperture from the same reason. It is really important to prevent from capturing other distracted lights when taking a light effect photo. 


I found helpful online sources: 

http://tips.romanzolin.com/articles/article054.php#DraggingwithFlash The site tells general ideas of the long exposure and the ways to use them efficiently.
http://tutorials20.com/misc/long-exposure-basic/ This site gives tips to create cool light effects with the long exposure settings on the camera.
I found images from dpreview challenges (http://www.dpreview.com/challenges/

The title of the piece is “Appealing Light by the artist, hokie . It is from the source, http://www.dpchallenge.com/image.php?IMAGE_ID=301389. This photo was taken at the artist’s studio on Feb 28, 2006. The scene of the image is a green light illuminating and circling a green apple that has nice water drops. The photographer purposely used similar light color as the apple to attract viewers’ eyes. Also, he or she used high color contrast between the apple and dark background to make the photograph more interesting. The setting which the photographer used was f/8 with ISO 200, and 25 sec shutter speed. The photographer could generate a light effect by using a slow shutter speed. He or she took 3 seconds to swirl the light to mimic an apple peel, and left the camera alone for the rest of 22 seconds. 


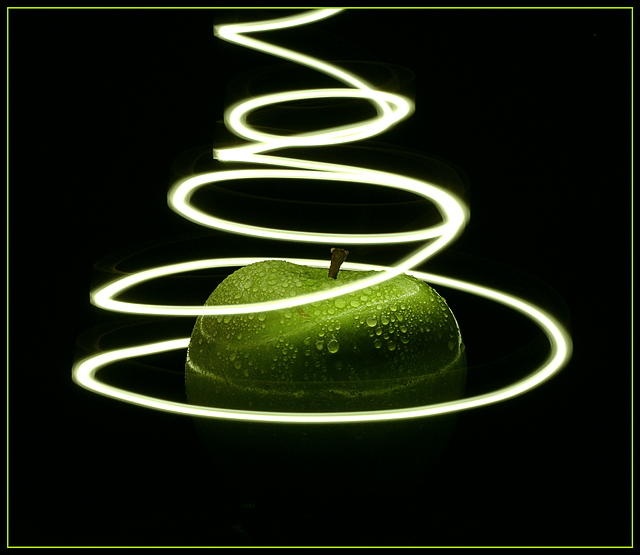
The title of the piece is “Lightmare” by the artist Albireo. It is from the source http://www.dpchallenge.com/image.php?IMAGE_ID=301648. This photo was taken at the artist’s home on Feb 28, 2006. The scene of the image is a red light monster trying to eat a woman. The photographer purposely used high color contrast between the monster and dark background to make the photograph more attractive. The setting which the photographer used was f/3.2 with ISO 100, and 15sec shutter speed. The photographer could generate a light effect by using a slow shutter speed. He or she created the monster by drawing it with a red torch in the darkness. 

The title of the piece is “Devilish Grin” by the artist, dswann. It is from the source http://www.dpchallenge.com/image.php?IMAGE_ID=981702. This photo was taken at the photographer’s home studio on Oct 31, 2011. The scene of the image is a flaming pumpkin that smiles. The shadow underneath the pumpkin makes the photo more interesting. Also, the high contrast between the pumpkin and black background makes viewers’ eyes to focus on the subject, pumpkin. The setting which the photographer used is f/6.3 with ISO 400, and 1/160 sec shutter speed. The photographer purposely used fast shutter speed to capture the fire in every detail. Although the photographer did not use the long exposure for this photograph, it is still a great example of using the light effect of fire to create the eerie feeling.

Contact Sheet:


Final Selections:


 I chose these pictures because they are the great examples of light effects. All of them, I used slow shutter speed to generate the light effect. I love these pictures. They are my desirable results that I wanted to take.
Description of Learning
Although this unit was very challenging, I really enjoyed it. Every work I did in this unit was absolutely new to me. From the beginning, the task that was given to me was challenging, because it required different form of work. I had to choose my own theme other than my teacher choosing it for me. I had to ponder for several days to find out what inspires me the most, and what I’d like to try shooting. Then, I came to this idea of using a long exposure to create light effects while I was searching for photographs. Right away, I started to search for tips for shooting light effects photographs, and began to love them. I hardly believed that the camera can create and capture light effects without using any kind of computer program. Before this unit, I knew about light effects, but didn’t know the ways to take them.  After searching for several hours, I began to understand the basic concept of light effects. However, when I tried shooting them, it was the hardest time ever. I could mimic light effects that I found as examples, but I could not get desired results. Like an infant, I could not control the photographs, but had to hope for them to work. I desperately needed Mr.Tahan’s advices. After getting advices and help from my teacher, I could finally get desirable results. From this unit, I learned the difficulty of shooting light effects photographs just by using the camera. I learned I cannot be a proficient photographer after few months of learning, but I have to spend a huge amount of time in order to develop my photography skills. I really earned a lot from my mistakes   

Development Options: 
If I were to shoot the images again, I would want to take higher quality pictures. Although I got some desirable results, they weren’t as good as the examples I have found. There were several problems. First, when I was creating light effects by shooting cars on the road at night, I took it from the bridge. Although I used tripod to settle my camera, the banister was blocking my camera, which made it hard to take stable light effect photographs. I had to hold the tripod up and tried hardest I can to stable the camera. However, it was inevitable to face undesirable results. There were so many distracted lights from my trembling hands. I just wanted lines heading to the same direction like this photo:  though my entire car light photos were with lights that are moving various directions. Secondly, it was really hard to draw the shapes that I wanted. It was really challenging to draw desirable shapes even I tried with different types of lights. These problems would be solved by more experiences I get from my past mistakes. If I have an opportunity to take light effect photos again, I would like to try taking more effective pictures by not making the same mistakes again.  

2011년 10월 12일 수요일

Unit 2 Portfolio Entry – Depth of Field and Motion


Project Outline: 
In this photography project, I learned effects of depth of field and motion blur on photographs. I will take shots which benefit from 1) Shallow and maximum depth of field 2) Motion blur that emphasizes the feeling of motion.

Class Notes:
In photography, the depth of field is defined as
the amount infront of and behind our focus point that is also in focus. There are three ways to change the depth of field. The easiest way is adjusting the size of the aperture. If the aperture is wide, such as f/3.5, more light passes through the lens, and the area which appears in focus becomes smaller. This means, by using a shallow depth of field with wide aperture, the lens focuses and emphasizes the subject while de-emphasizes the foreground and background. Small depth of field with large aperture is frequently used in portraits. In contrast, by using a small aperture, such as f/16, less light passes through the lens, and the area which appears in focus becomes lager. By using the large depth of field, with little amount of light, the lens focuses the entire image. This is often used in landscapes. In addition, if the light in which picture is taken is really bright, the less light would be needed to expose properly, and the photographer should use bigger f-number. In contrast, if the light is dimmer, more light is needed, and the smaller f-number should be used. The second function that affects the depth of field is the focal length. Longer the focal length makes the picture shallower, because they enlarge the background relative to the foreground (due to their narrower angle of view). The last way to change the depth of field is the distance to the subject from camera. Closer distance makes shallower depth of filed. Inversely, far distance makes larger depth of field.

Example of shallow depth of filed:


In photography, motion blur happens when a photographer uses slow shutter speed, and does not stop the motion. For example, when a photographer photographs someone whose moving, the subject will move a very small distance in 1/60 of a second. But in half a second he or she could move half a meter, and that’s what the camera is recording. This motion blur gives an effect that emphasizes the movement and action. There are several ways to take motion blur pictures: shutter speeds, camera shake, subject motion, pans, and pull zooms. In order to take any kind of motion blur pictures, photographers should use slow shutter speeds and have a long exposure. However, sometimes a photographer might not want a motion blur picture, but accidentally takes it. This is mainly caused by camera shake, which is from trembling hands. No matter how steady people's hands are, people cannot hold something motionless for very long. However, by using a long exposure, a photographer can take various styles of motion blur. One of the most common way is to take objects that are moving rapidly, while the camera is still. Second way is panning, which is pretty similar to the first one. Panning is a technique that allows the subject to be in focus while the background is blurry. This technique is great to show motion. The basic concept is to pan the camera, or move it with the moving subject, and take subject at the same place in the frame. This allows the subject to stay in focus. However, this usually only works for subjects moving in a straight line. Also, any parts of the subject that aren't moving in the same direction will be blurry. Example of panning:  

The last way to take motion blur pictures is called pull zooms. This is an effect where the subject looks like it is either moving towards or away from the viewer with motion lines. To use this effect, a photographer should again set the shutter speed to be a longer exposure. Then, he or she should use zoom lens to either zoom in or out from the subject while he or she takes the shot. This means, between when the shutter opens and closes, the photographer should zoom in or out from the subject. 


Researched Notes and Images:


I found helpful online sources: 

http://www.photopoly.net/depth-of-field-in-photography/ 
The site tells general ideas of depth-of-fields and the ways to use them efficiently.
http://photo.tutsplus.com/tutorials/photography-fundamentals/an-introduction-to-mastering-slow-shutter-speeds/
http://www.digital-photography-school.com/using-the-zoom-effect
These sites give general informations of different types of motion blur pictures.
I found images from dpreview challenges (http://www.dpreview.com/challenges/


The title of the piece is “Web Defender” from the artist, stphq. This photo was taken at the artist’s garden on Sep 8, 2008. The scene of this image is a spider with clear details. Because the photo was taken in a very close distance with a shallow depth of field, the spider is in focus, while the other subjects at the back of the spider are out of focus. The artist purposely used a shallow depth of field to highlight his or her main subject, spider, and to get rid of distractions in the background. The setting the photographer used was aperture of f/3.7, ISO 200, and 1/104 sec shutter speed. The artist was able to make a shallow depth of field by using a wide aperture, f/3.7. Also, by using a fast shutter speed, the photographer was able to balance the lighting. However, artist edited his or her photograph by cropping and adjusting.  

The title of the piece is “Veteran, Biker, Parader” from the artist, levyj413.This photo was taken in New York City on Nov 11, 2006. The scene of this image is an old biker in front, who is in focused, while other bikers and paraders are in motion blur. The setting that the photographer used was aperture of f/5.6, ISO 50, and 1/20 sec shutter speed. The photographer was able to make a shallow depth of field by using a wide aperture, while he or she purposely used slow shutter speed to emphasize the motion. The technique that is used in this picture is panning, where the subject is in focused while the background is not. Here, many viewers will be bewildered about the setting, where we all know that slow shutter speed does not go with wide aperture, because the picture will be so bright. But ISO clarifies the photographer’s setting. He or she used ISO of 50, which is really low, to balance the lighting. The slow shutter speed and wide aperture could make the picture pure white, but he or she lowered ISO to reduce the light that comes into the camera.
The title of the piece is “Ascension” from the artist, Brent_S . It is from the source, http://www.dpchallenge.com/image.php?IMAGE_ID=976953. This photo was taken in Seattle, WA, USA on Sep 30, 2011. The scene of the image is a guy ascending the stairs with a motion blur, which looks like he is on an invisible escalator. This dramatically emphasizes the motion. Also, the color contrast between red, green, and his yellow coat makes the photograph more interesting. The setting that the photographer used was a small aperture, f/14, with ISO 50, and 1/60 sec shutter speed. The photographer purposely used wide depth of field to focus on wide range of photo, while he used slow shutter speed to emphasize the motion. Slow shutter speed balanced the lighting. (I'm sorry, but I could not copy the picture. Please go into the link to see the picture)


Contact Sheet: 
Shallow Depth of Field:
 Wide Depth of Field:
 Motion Blur:

Final Selection(s): 
 I chose these pictures as my final selections, because they are my favorites. These pictures are my desired results, and they clearly illustrate my learning in this class. The first picture efficiently shows my purpose of blurring out the background to lead viewers' eyes on the subject. The second picture effectively depicts my purpose of focusing on the wide depth of golf course to show where my sister is hitting the ball to. I also like the background, where the hills and the sky are in balanced. The shadow of my sister makes the picture more attractive by making a contrast to the green grass. The third and fourth photos are great examples of subject motion. For third photo, I like the way subject is in a movement, while the other 2 other people at the back are in focused. This gives an effect that emphasizes the movement and action. The fourth photo is my mom who is descending the stairs with a motion blur, which looks like she is on an invisible escalator. This dramatically emphasizes the motion. I really love them.

Description of Learning


Although this unit was challenging, I really enjoyed it. I was really grateful to earn a lot from it. Before this unit, I really wanted to take portrait photographs, but didn’t even know how to take great portrait photos. The only thing I knew was to use shallow depth of field by using a wide aperture. During the unit, I learned the most important lesson in portrait photography: focus on the subject’s eyes. By learning this lesson, I could take advanced portraits that have emotions. However, I knew nothing about motion blur photographs. After hearing general ideas of motion blur, I thought it would be easy to take. This churlish thinking was soon devastated. As I practiced shooting motion blur pictures, I figured out the difficulty of taking desirable motion blur pictures. However, by getting advices from internet sources and teacher, I finally could take attractive pictures.
Development Options: If I were to shoot the images again, I would take more pictures on Bangkok city with wide depth of field. During the unit, I did not use small apertures as much as large apertures. This caused most of my pictures to have shallow depth of filed. I had a lot of portrait pictures, while I only had few landscapes and buildings photographs. If I have an opportunity, I really want to use wide depth of filed more. Also, I would like to try taking more effective pictures by using all the compositions I learned in the class.